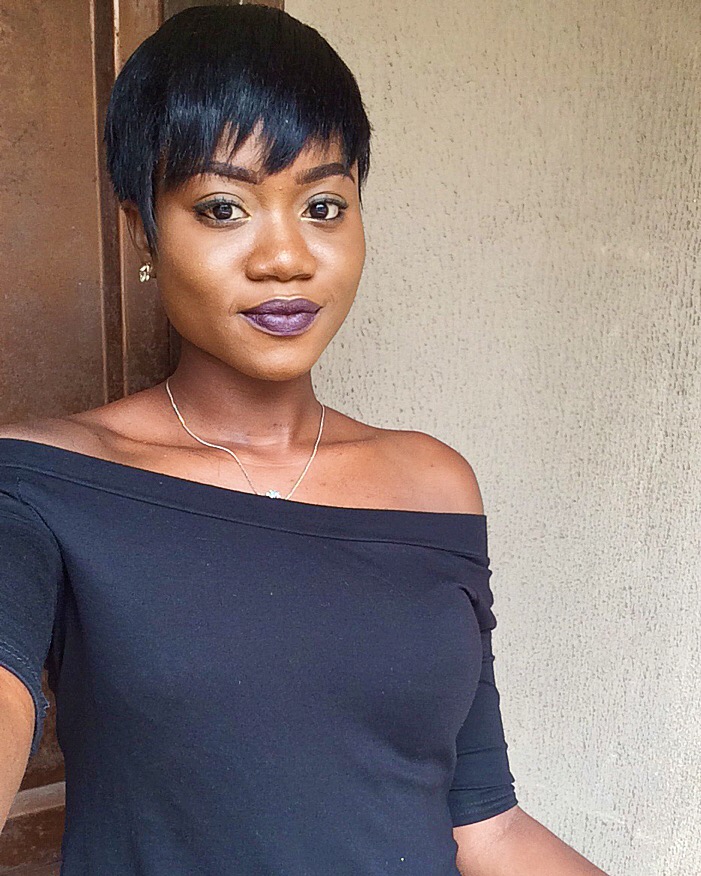
Hi my lovely people.. So I started 2016 with a Bang! Okay maybe not a bang but bangs and pixie cut, same difference lol..
 Anyway, If you’re reading this post then you made it to the new year and I couldn’t be more thankful for you because as we know, it’s the greatest gift to have life. I started this blog in 2015 so if anything, I’m grateful for the past year and all the lessons it brought but that’s not why we are here lol. I know I was away for a while but that’s because I had to go to Nysc camp and Bla Bla.. Don’t even want to get into that one.
So I took out the crochet braids from this post and had a wash day similar to this one minus the protein treatment because my hair really needed the love.
I wanted to start the new year feeling myself with a little bit of Rihanna on the side so what I did was make this Pixie cut wig! There’s a feeling you get when you do something and you know it’s all you! Who else can relate? Lol.. Btw, it was my first time so I was a little nervous but please why do I use all that data watching YouTube videos if I can’t learn anything? Lol. I’ll leave a link but I watched a couple of videos so I can’t even remember.. You could type ‘How to make a pixie cut wig’ into the search engine and see what comes out. Making this wig wasn’t super easy but it definitely wasn’t difficult..
So what you’ll need:
– The weave you want to use. For this, I’ll advice you use something inexpensive as you’re still going to cut most of it.
– A wig cap or two.
– A handkerchief (if you want)
– A scissors
– Razor blade
– Bonding glue
– Hair spray
– Of course your mannequin head.
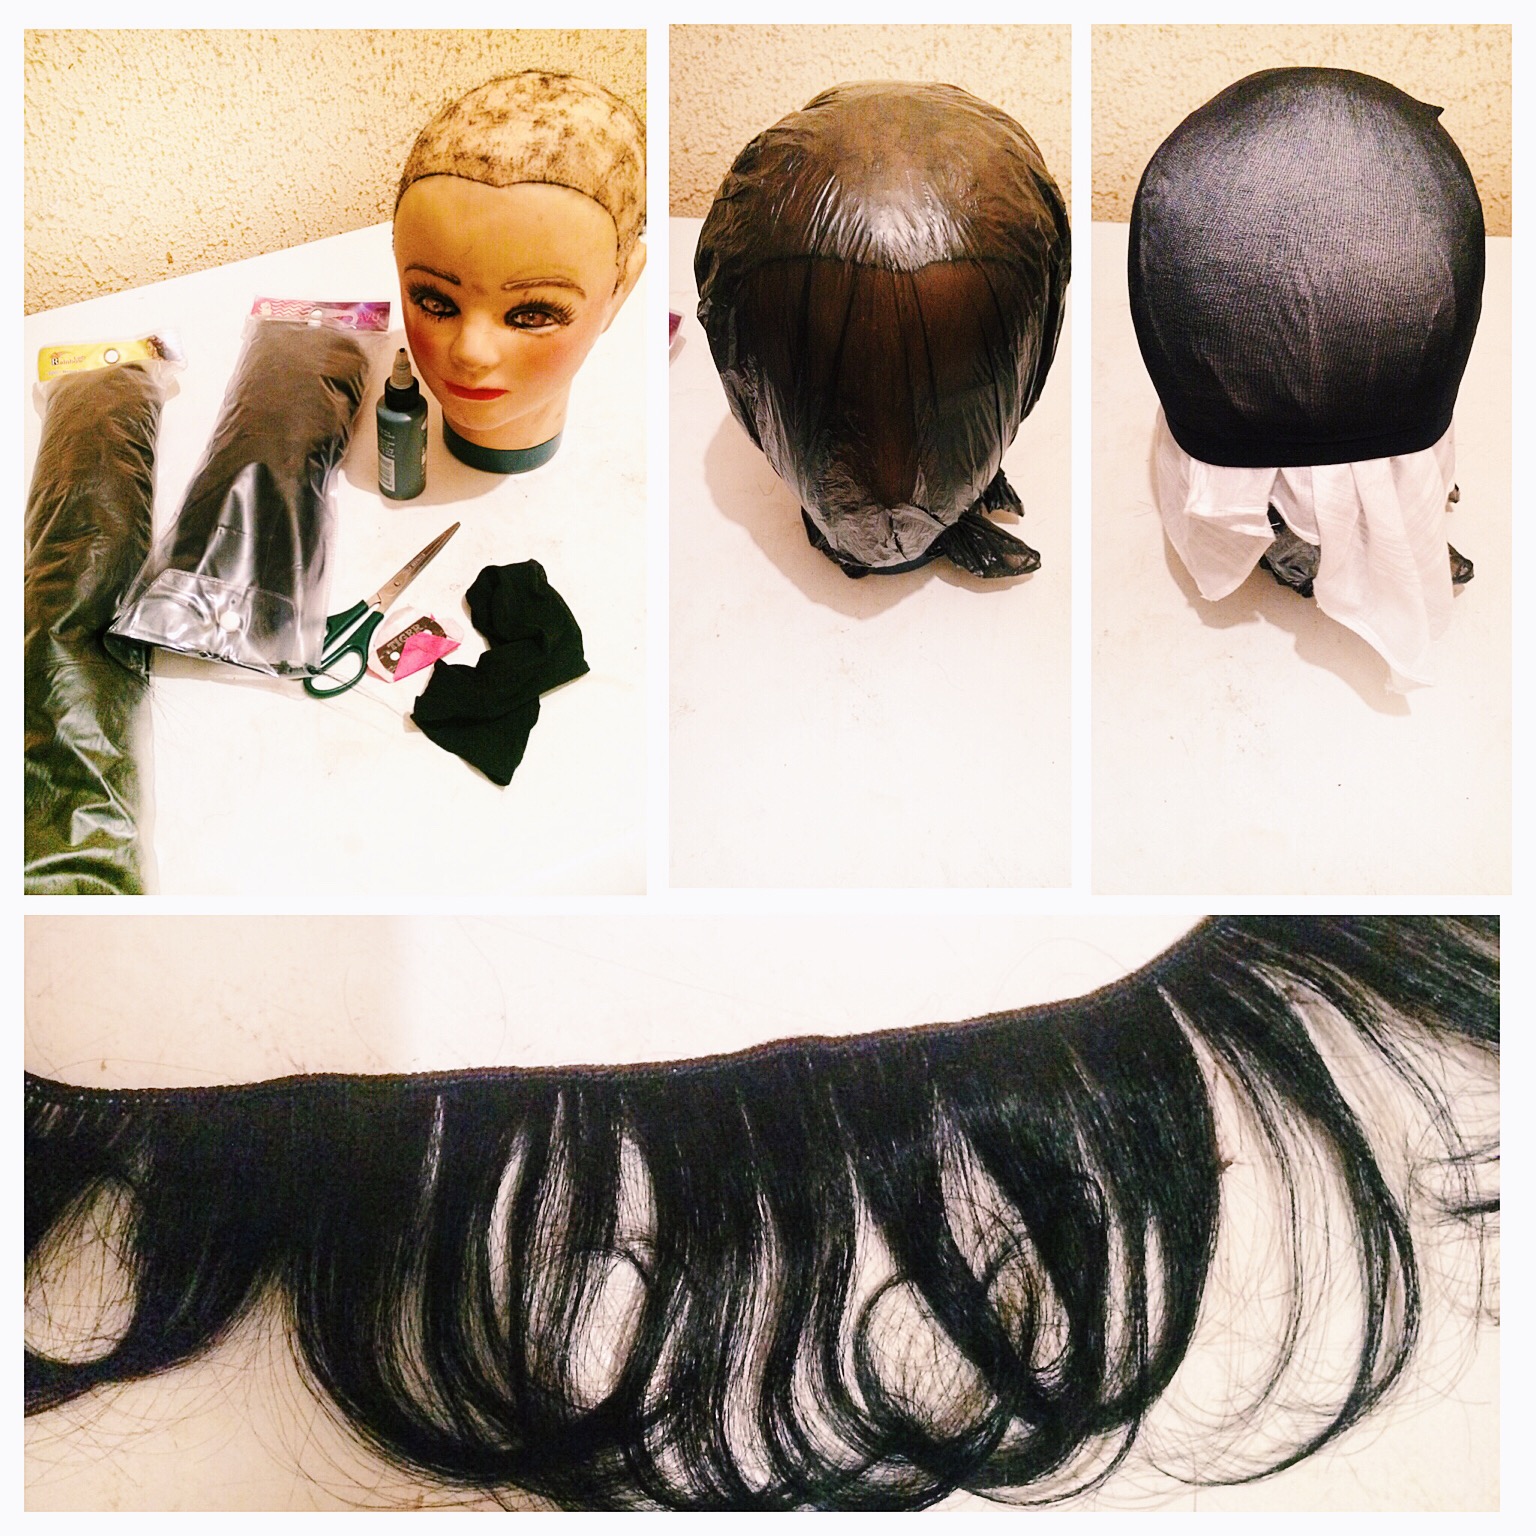
I started by putting a nylon over the mannequin just in case any glue got through but it didn’t so I guess you can skip this step except you’re not using a handkerchief inside your cap which I strongly suggest you do.
– So it’s nylon, handkerchief then wig cap.
– Split the weft of the weave into two. This makes it lay flatter
– Take the weave you want to use, measure it against the mannequin, apply glue, attach and spray..
Its basically Measure, cut, glue, repeat in a U shaped way so that it forms a circle… I didn’t think I’ll need the hair spray before I started but I found that the glue doesn’t really hold without the spray. A video explains this better but maybe the pictures will help.. But you can follow my snapchat -medupinella because I post some of these things there..
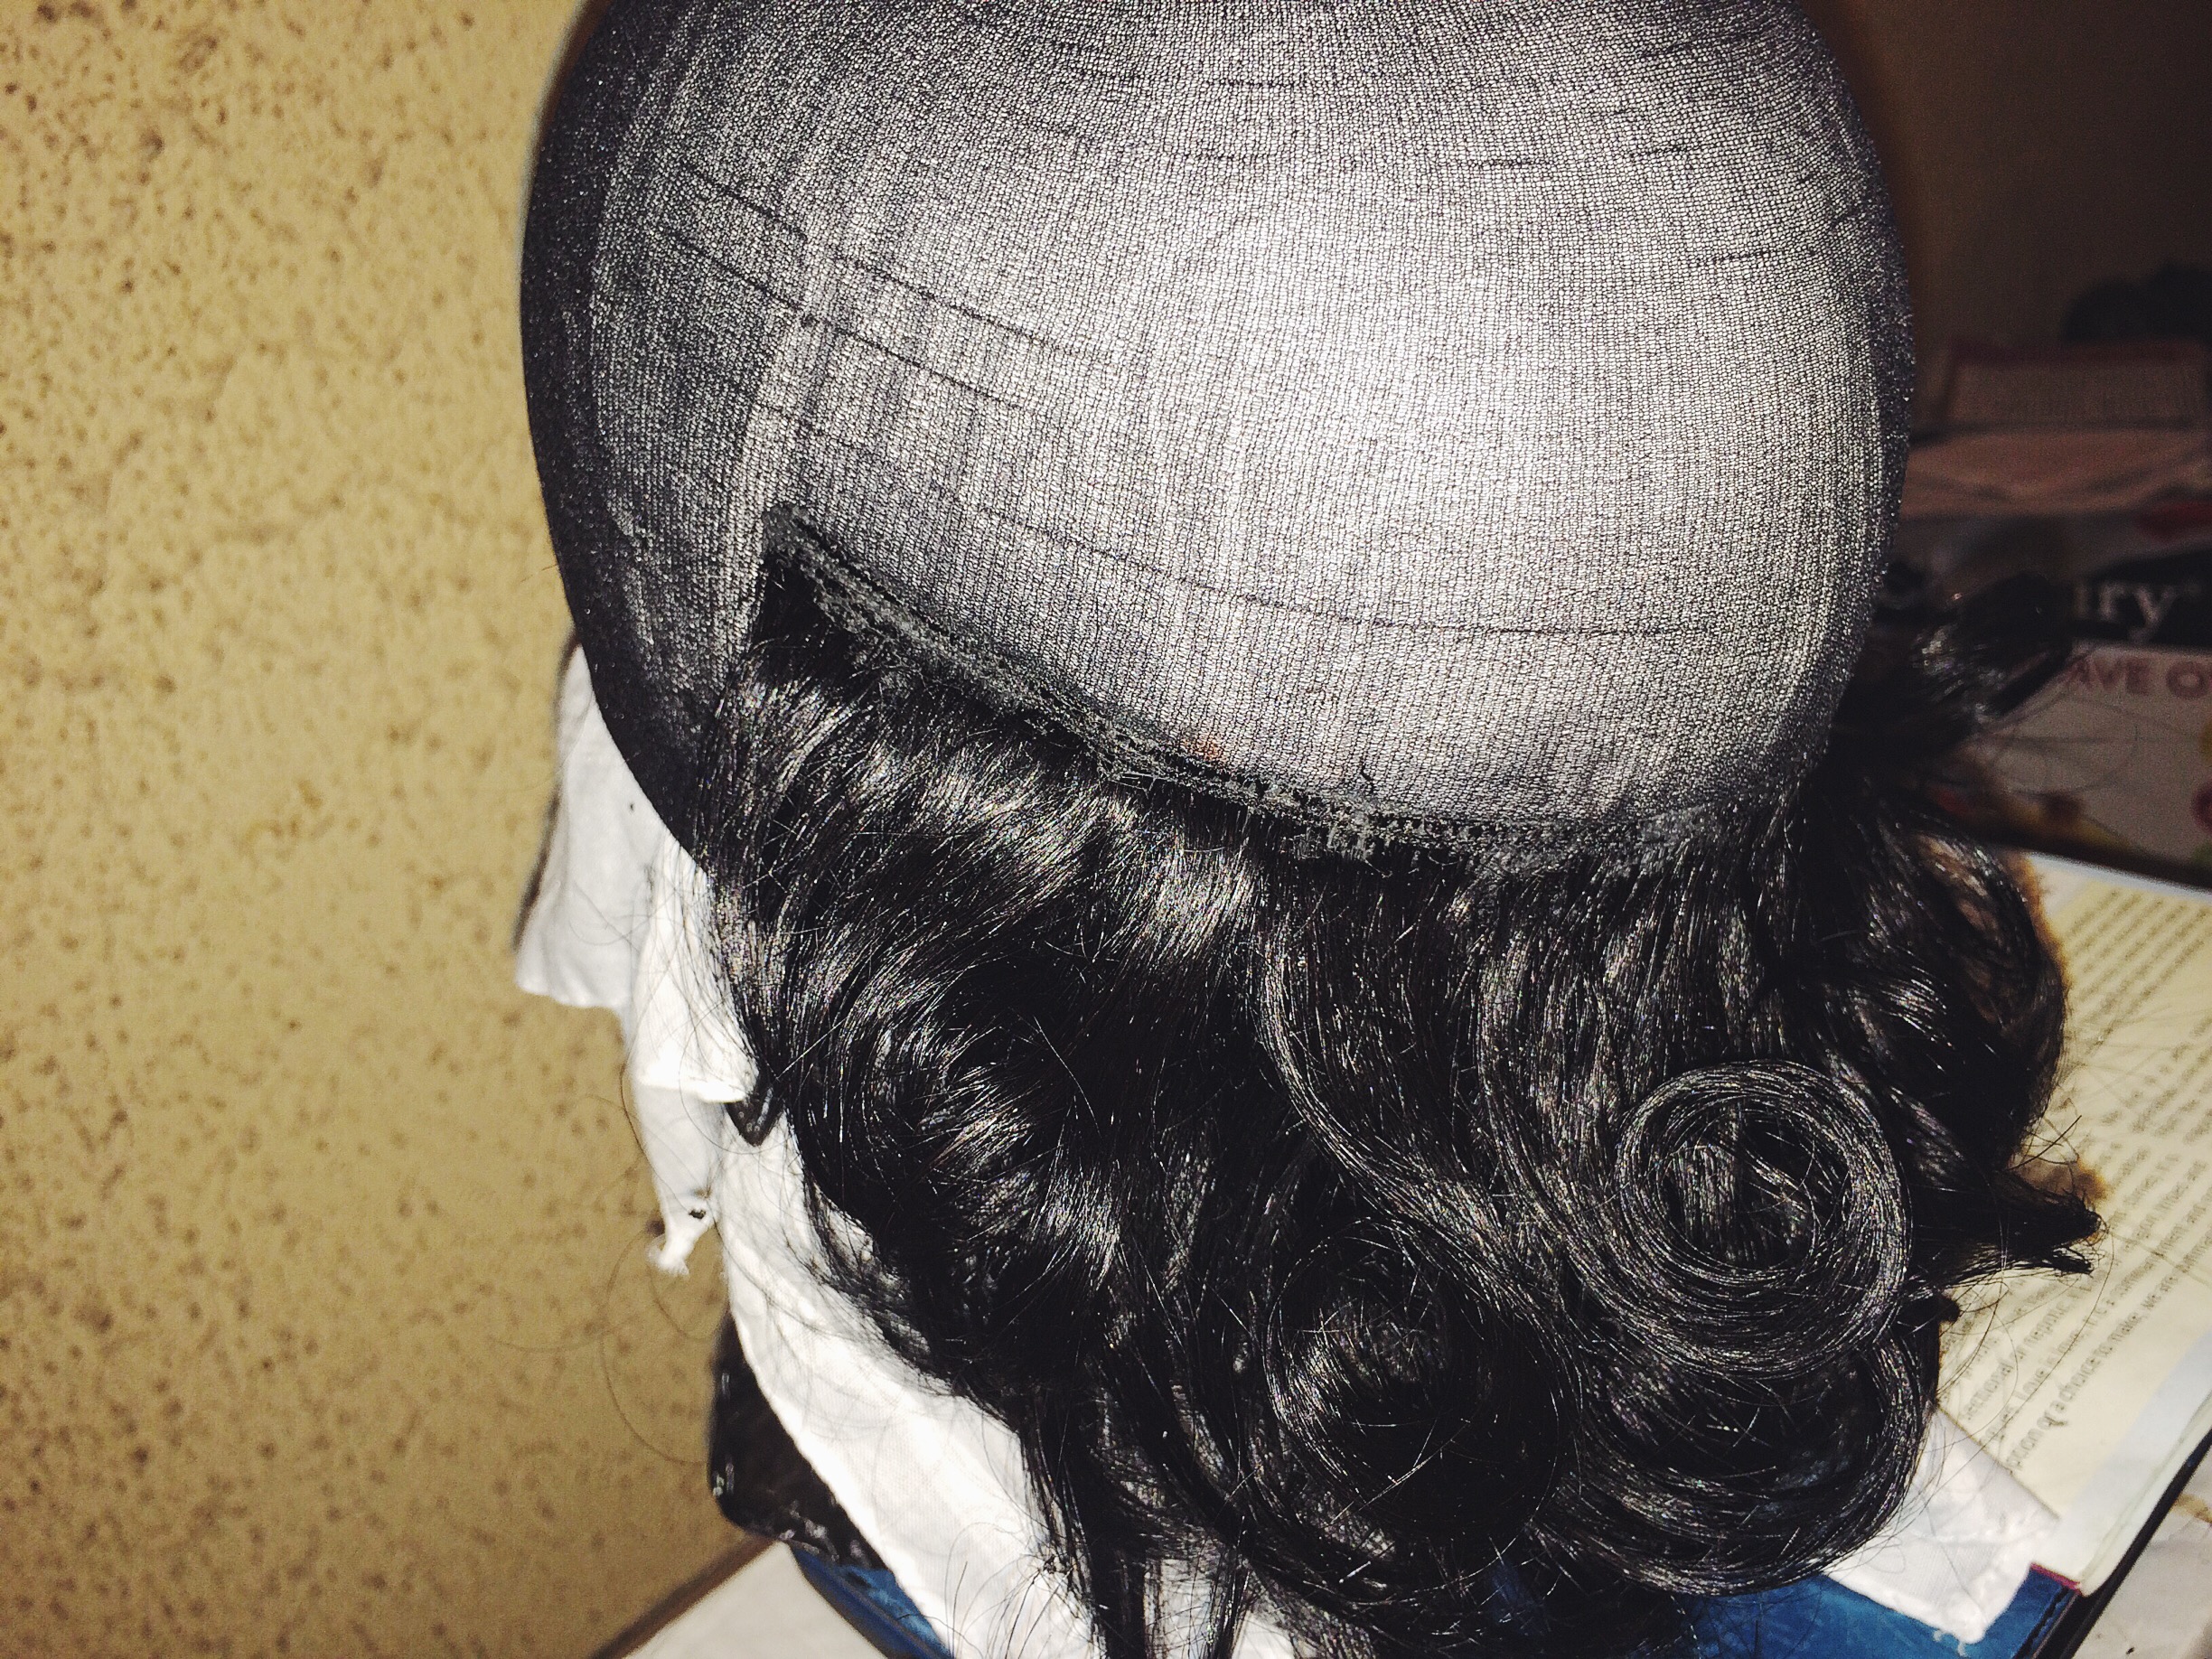
The back I’m progress. Doing the front the same way forms the circle.
Anyway, doing this, make sure there’s little to no space between the tracks especially at the back where it will be flat, if not the space will show.. The closing was a little tricky cos I thought I could ignore the videos I watched and do my own thing so it was a miss for a while but I finally laid it.. When I was done with this and it was time to style it, I was a little nervous.. I had an idea of what I wanted so I just used that picture.
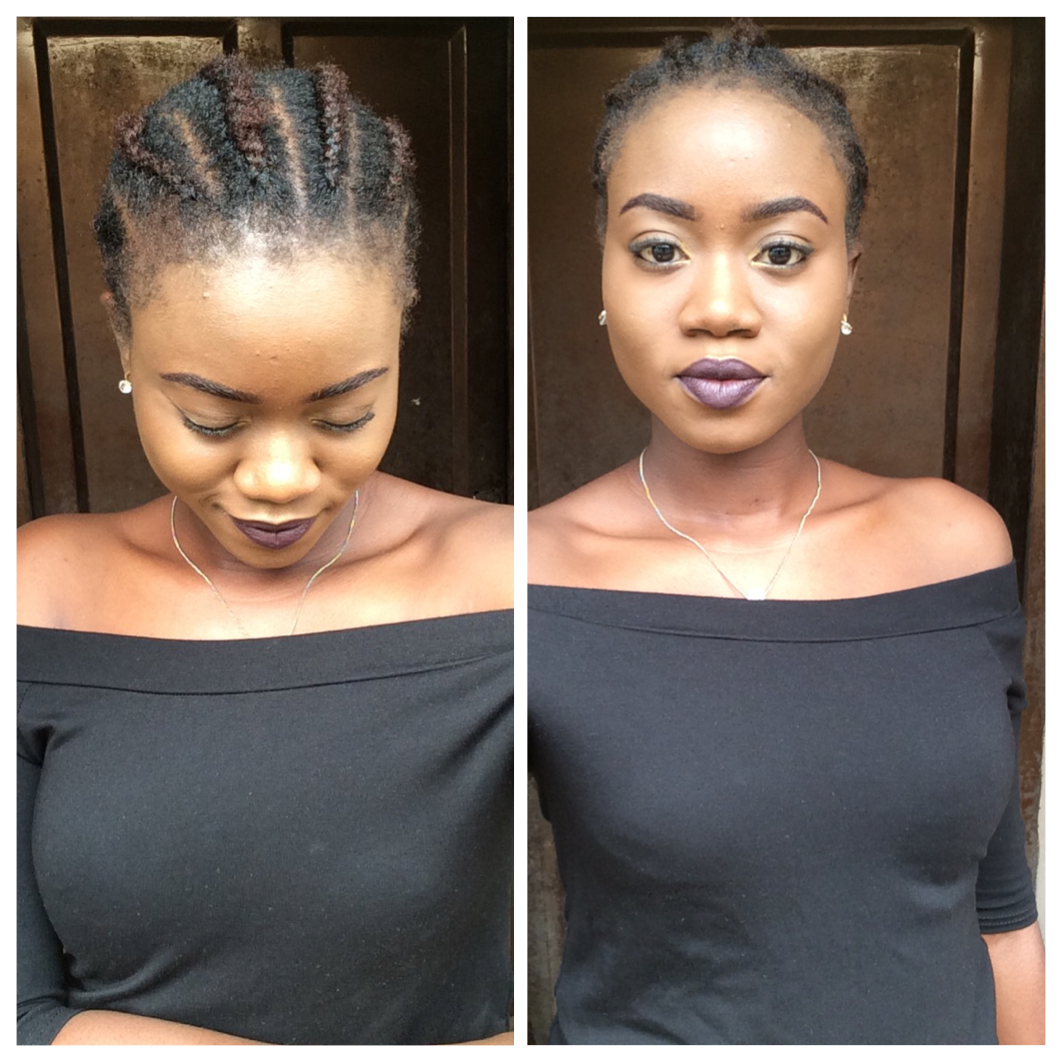
But it turned out that styling it wasn’t that big of a deal.. I took the hair off the mannequin, trimmed off the handkerchief then wore so I could style the front to know exactly how it was turning out.. Sat in front of a mirror and started chopping in sections.. That’s the best way to do it.. Take a section of the hair and just chop it carefully using a razor blade. Brush and repeat.. It was fairly easy.. I flat ironed the hair to make it lay flatter and this is the finished look..

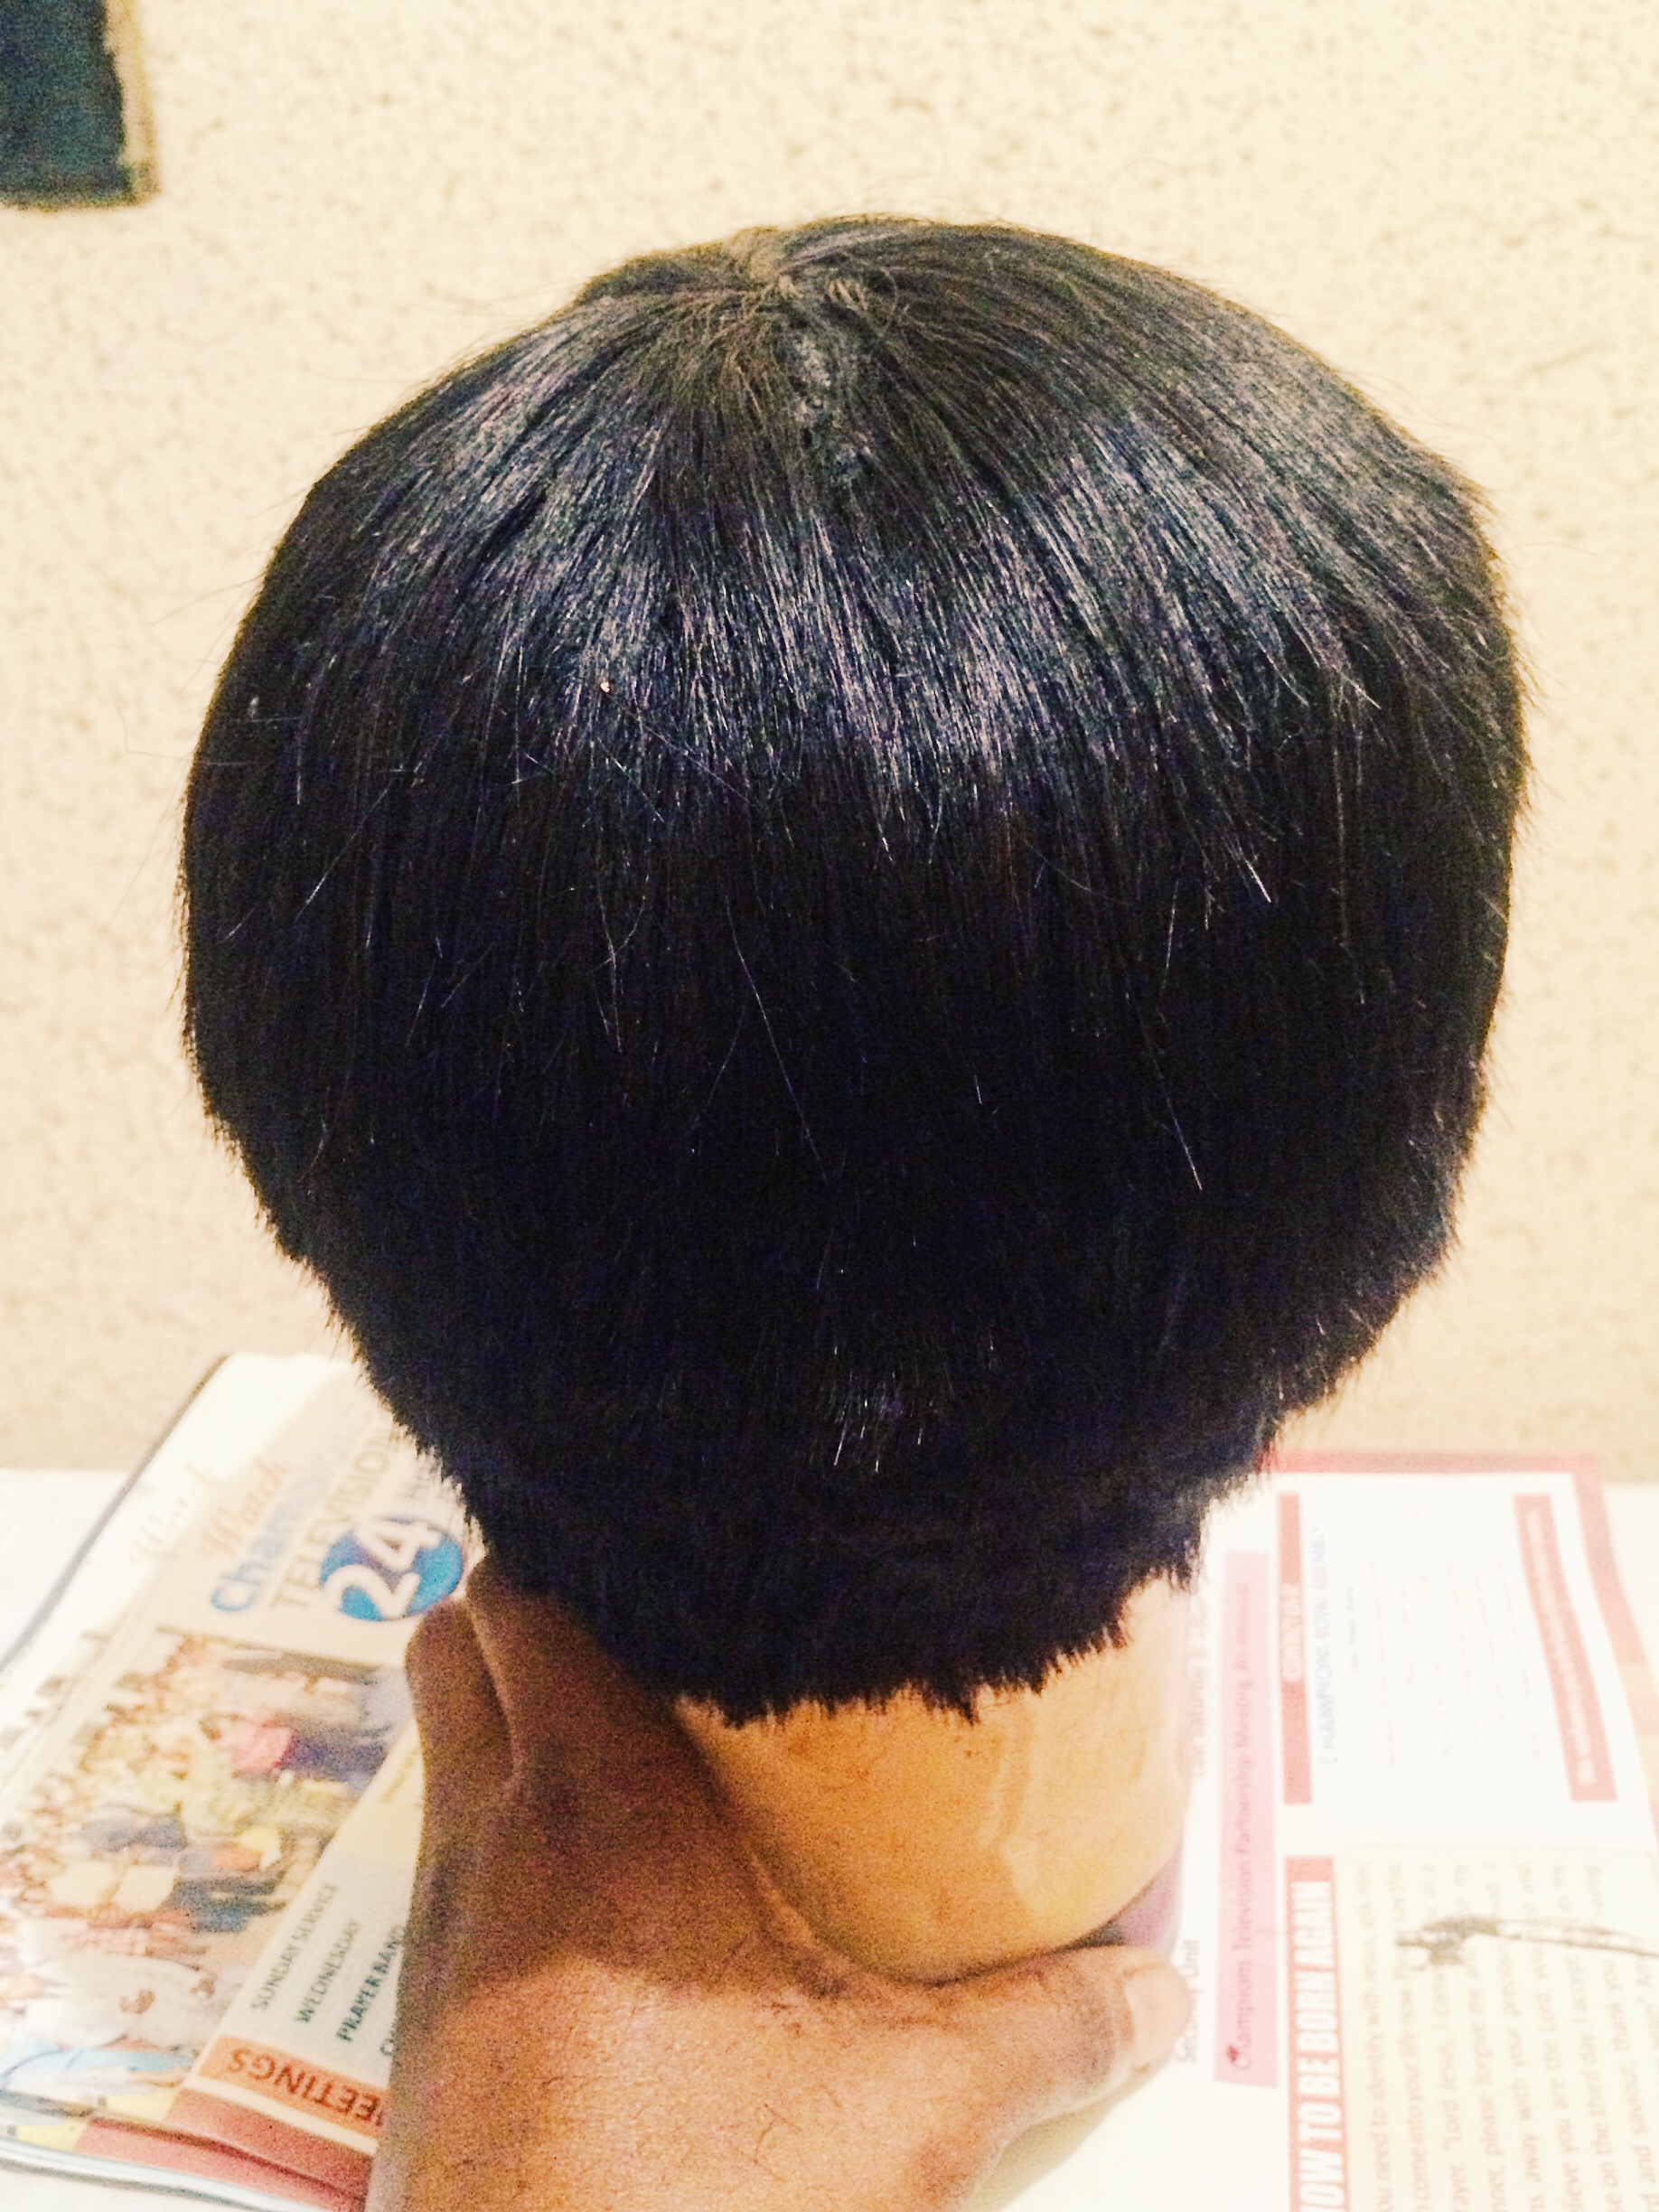
Back all done..sorry about the picture quality.
Can we take a minute to appreciate the fact that my hair now goes in cornrows all the way to the back? Lol
So guys, what do you think? Hit or miss? Couldn’t get clear pictures of the back but it’s pretty basic and flat.. The advantages to having your wig made this way is that there’s no risk of the glue getting to your hair and you can style it however you see fit and please talk about how cheap this is depending on the weave you use. This blog is still dedicated to making you look like a babe while spending on a budget. The disadvantage is the time it takes if you don’t have any assistance.
I’ll be doing more DIY hairstyles this year hopefully so please stay. Let’s do it together. And if there’s any style you want me to make, just ask.
Thank you guys soo soo much for all the love in 2015. Really guys. There’s a whole lot planned for this new year and I’m sure it’ll be fun.
Joy and gladness… Ella.

Girl your hair is awesome! Its definitely a hit. I’m so going to do this. Thank you
LikeLike
Thank you so much! You should do it and let me see pictures when you’re through..
LikeLike
ella when are you going to do my own?????
LikeLike
When you’re ready b. Glad you’re back to blogging again!
LikeLike
Once you’re ready b. Glad you’re back to blogging!
LikeLike
Well done. Laziness wont even allow me try.
Epiphany29.com
2015 And I
LikeLike
lol thank you..
LikeLike
Its so beautiful!!!
LikeLike
Thanks love…
LikeLike
I love the hair. Slayed the finished look.
LikeLike
Thank you..
LikeLike
It’s beautiful.
And girl, I love your smile.
LikeLike
Thank you so much Oge..
LikeLike
I like to do my hair myself as well! I have only been to the salon about 3 times in the past 3 years or o. I tried to do a pixie wig one time but for some reason, after slaving over it, it couldn’t fit my head. Msheeew. Your wig is great I’ll definitely be trying this out soon.
Thanks for sharing.
LikeLike
Yea some mannequin heads come really small so the trick is to pull the wig cap all the way down. Guess I got lucky with this one. Thank you
LikeLike
If only I had a mannequin head… Girl you are slaying in that wig. Yes to budget beauty. I love the cut. Haven’t done a pixie look in forever
Naija girl next door
LikeLike
Thank you so much Sandra. This one costs just 1400 in Balogun market. Getting it was long overdue.. You should too!
LikeLiked by 1 person
Thanks for the post am also on a budget like u…lolz.. lemme goan copy
LikeLike
What kinda wig cap did u use
LikeLike
I think it’s called the socks cap but it’s just the regular type you can get at salons or in the market for N50 each..
LikeLike
This is amazing Ella
LikeLike
Thank you Abisco.. :*
LikeLike
Hi Ella,
Lol @ “Bang” I love the pun.
Ah! this is a HIT with a capital H. Wow! You keep slaying at this DIY hustle. I am so impressed. Hairdressers cannot do shakara for you at all. 😀
The style really suits you very beautifully too.
I hope you had a good Christmas? I wish you happiness and blessings in the New Year!
LikeLike
Your comments put a smile on my face. Thank you so much for the encouragements and for getting my joke lol. Christmas wasn’t exactly fun but it wasn’t bad either.
I wish you an amazing year ahead.
LikeLiked by 1 person
Definite hit!
Love
Nappyhaired.com
LikeLike
Thank you!!
LikeLike
Happy HAPPY new year to you, Ella. May your fro grow and your face never lose its glow… 🙂 I wish you God’s best in everything.
I’ll definitely submit my DIY style requests as we go along.
The wig is definitely a hit. It came out really good and it sets off your features so well. Well done!
http://www.thegracedmisfit.com
LikeLike
Thank you thank you Oreofe and Happy new year to you too.. Wish you a year of gladness and peace. I’ll be looking forward to those request girl.. Thanks.
LikeLike
I was actually thinking of making “short hair” soon… thanks for this Ella… helps with my decision.
And it really suits you..fine geh, beautiful lady 🙂
And Happy new year to you also!
LikeLiked by 1 person
I love this so much it looks so amazing on you .. Thinking I should try this out I’ve been thinking about it for a while.. Thanks for this post ! (:
LikeLiked by 1 person
Hit!!!!!
LikeLike
Really comprehensive and a step-by-step guide. Well done, Ella!
LikeLike
Wow! Wonderful DIY. I’d like to know the exact name of the weave you used.
crazynigeriangirl.com
LikeLike
Hi,i’m new here love your blog✊🏼
LikeLike
Hi precious. Glad you’re here.. Please keep coming back.
LikeLike
Looks great! The style really suits you. Please which weave did you use?
LikeLike
This is awesome.. Would try it sometime and share.. Thanks Ella..
LikeLike
Wish I had seen that comment on the cap shrinking before I attempted mine, it didn’t fit my head. 😳
But I will give it a try again and see how it goes.. I hope it works this time.
LikeLike
Aww. Let me know if you do..
LikeLike
Love this post! Stumbled on here from your instagram page. Wanted to ask what type of hairspray you used and how exactly you use the glue and hairspray.
LikeLike
I really luv this blog, pls can u explain how to make flat puffy style with afro kingky twist
LikeLike